You want to render a certain number of elements at a time, and once you scroll to the bottom of your page, you’ll then render the next set of elements. This process can rinse and repeat until you’ve scrolled to the very bottom and have reached the last entry in your data set.
This can be beneficial from a usability perspective when users are browsing indefinitely through large amounts of data (think scrolling through a news feed on a social media mobile application or some large list of user generated content). Instead of clicking a button to proceed to the next page in a paginated way, the rendering of new data is automated once the user has scrolled to the end of the page.
For this demonstration, we will be using Angular 14 as well as a publicly available REST API that displays a list of cats and information about them (TheCatAPI). The source code for this example can be found here, and you can find a live version of this example here.
New Project Setup
Let’s now dive into implementing our infinite scroll example by first creating our project. You can create a new project by running the command ng new angular-infinite-scroll-example. You can title your project anything you would like. In the case of our example, our project is titled angular-infinite-scroll-example.
Once your project has been created, navigate into your project directory by executing the command cd angular-infinite-scroll-example. From within this directory, you will want to add the Angular material dependency. This dependency is needed to create the cards where each of our data entries will be rendered in the UI.
ng add @angular/materialNext you’ll want to install the ngx-infinite-scroll package. This dependency will be used to implement our infinite scroll functionality.
npm i ngx-infinite-scrollNext let’s import our InfiniteScrollModule in our app.module.ts file. We’ll also import the HTTPClientModule for making REST API calls as well as the MatCardModule which is what we will use to display information for each entry returned from the API call.
import { HttpClientModule } from '@angular/common/http';
import { MatCardModule } from '@angular/material/card';
import { InfiniteScrollModule } from 'ngx-infinite-scroll';
...
imports: [... HttpClientModule, MatCardModule, InfiniteScrollModule]
Creating our Model and Service
Next let’s create a model that will resemble our Cat object for the entries that we would like to render. It’s typically good practice to define models for each of your entities being worked with in an application as it sets a standard for your data model and helps keep things organized.
ng g i cat --type=modelOur end result with all of the desired properties will look as follows:
export interface Cat {
    name: string,
    temperament: string,
    image: any,
    description: string
}
The next step we need to perform is to create our service class. Our service class is where we will consume our API that ultimately fetches the data that we will be using for our infinite scroll example. Our API we are using in this case is the mentioned CatAPI and we will be using it to retrieve a list of cats to display in our example. We can generate a new service by executing the following command: ng g s cat.
Within our CatService class we can create our function getCats(page:number) which will consume our API to retrieve a list of cats. You’ll notice we take a page as an argument here. Along with the page query parameter, which keeps track of which page we are on, you’ll also want to make note of the limit query parameter. This is the number of records we are retrieving per API call (in this example we are retrieving 5 records per API call). This is how the API call will keep track of what page we are on. In order to actually consume the API, we will inject the HttPClient module into the constructor of our service class. The service in our demo will appear as follows.
import { Injectable } from '@angular/core';
import { HttpClient } from '@angular/common/http';
import { Observable } from 'rxjs';
import { Cat } from './cat.model';

@Injectable({
  providedIn: 'root'
})
export class CatService {

  constructor(private http: HttpClient) { }

  getCats(page: number): Observable<Cat[]> {
    return this.http.get(
      `https://api.thecatapi.com/v1/breeds?page=${page}&limit=5`
    ) as Observable<Cat[]>;
  }
}
Adding the Infinite Scroll Logic
Now that we’ve set up our project, created our Cat interface as well as our CatService, we can move on to implementing the infinite scroll functionalities in our app.component.ts and app.component.html files.
Let’s start by looking at our app.component.ts file. The first thing we are doing is we are initializing our key variables as follows:
page = 1;
cats: Cat[] = []
We initialize our page variable to 1 since we want to start on the first page in terms of our API request. We initialize our cats array to be an empty Cat array. We will be using this collection to store our response from our API call.
Next you will see that we are injecting our CatService into our constructor. This is so that we have access to the getCats(page) function from the CatService file in our component and we can make that API call.
constructor(private catService: CatService) {}Next let’s look at our ngOnInit() function. This function is part of the Angular Lifecycle that will get called each time the page is loaded. Within this function we call the getCats(page) method and pass in the current page number (In the case of the page just loading for the first time, the page will just be 1). Once that call has completed, we set our cats array equal to our cats response from the API call. You’ll see that we are setting the cats response to a Cat array to keep our data clean and consistent with our defined model.
ngOnInit(): void {
   this.catServic
      .getCats(this.page)
      .subscribe((cats: Cat[]) => {
         this.cats = cats;
      });
}
You’ll then notice the onScroll() function. This function will fire based off of a (scrolled) event in our app.component.html file which we will take a look at here shortly. Within our onScroll() function we call our getCats(page) method from within CatService. You’ll notice each time we make this call, we are incrementing the page by 1 to indicate that we would query the next page of data in our API. We then append the cats response from our API call to our existing cats array. We do so using the spread … operator so that we can append the entire response at once to our array. Our full component will look as follows:
import { Component, OnInit } from '@angular/core';
import { Cat } from './cat.model';
import { CatService } from './cat.service';

@Component({
  selector: 'app-root',
  templateUrl: './app.component.html',
  styleUrls: ['./app.component.css']
})
export class AppComponent implements OnInit {
  title = 'angular-infinite-scroll-example';

  page = 1;
  cats: Cat[] = []

  constructor(private catService: CatService) {}

  ngOnInit(): void {
    this.catService
      .getCats(this.page)
      .subscribe((cats: Cat[]) => {
        this.cats = cats;
      });
  }

  onScroll(): void {
    this.catService
      .getCats(++this.page)
      .subscribe((cats: Cat[]) => {
        this.cats.push(...cats);
      });
  }
}
Now let’s investigate our app.component.html file. This is where we will actually render our data and display it on the UI in the manner that we would like. You can go ahead and delete any autogenerated boilerplate code in this file.
We begin by defining a div with some properties related to infinite scrolling. These include the infinite-scroll attribute to indicate that we would like to perform infinite scrolling within this div.
The next item is [infiniteScrollDistance]. This represents how far to the end of the div the user needs to be in order for the next scrolled event to fire. This is a multiplier based on the size of the browser window. The default value is 0 which would mean the next scroll event would fire once the very end of the page is reached. In our example we use 2, which would mean that the next scrolled event will fire once we are approximately 80% to the end of the current view.
The next item is [infiniteScrollThrottle] which serves as a delay in milliseconds (in our case 1000) on when to execute the function in the (scrolled) event. The benefit of this delay is that otherwise that function would be fired too many times and could ultimately result in some performance issues.
The last item you’ll see is the (scrolled) event. This contains the function that will execute when the user has scrolled to the end of the page. In our case we will be making the API call with the incremented page value to get the next chunk of data.
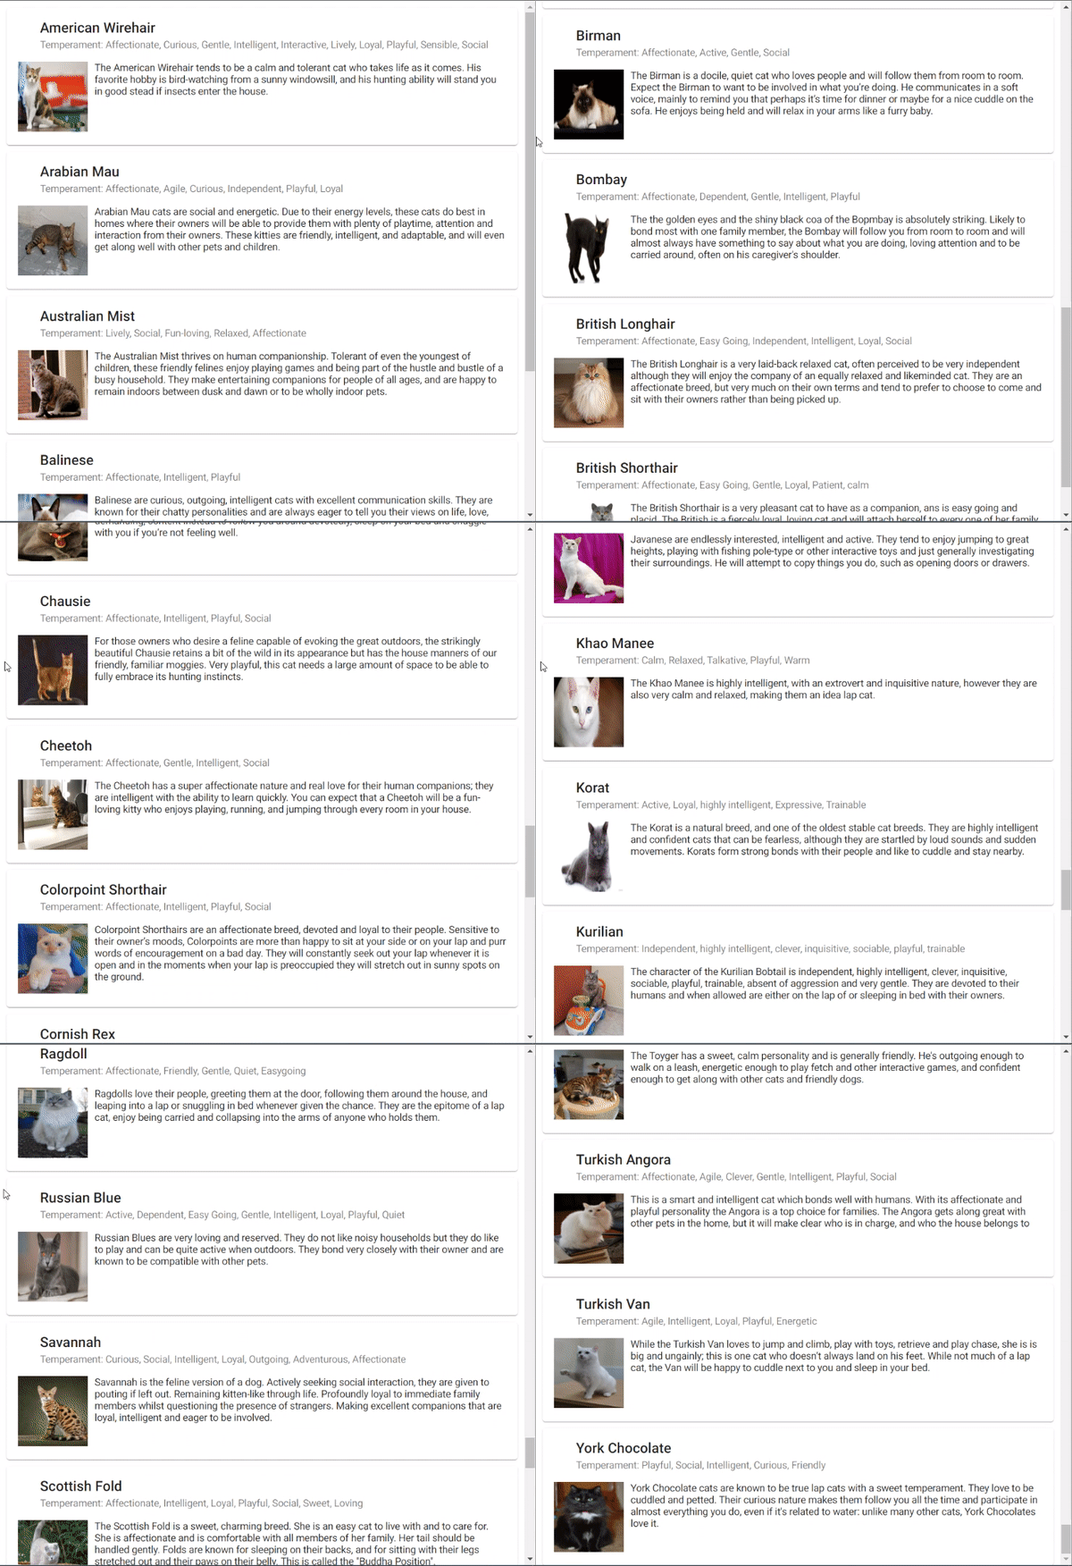
Next we create a mat-card to store each entity returned from our API call. Within this mat-card we are displaying key information from the response for each cat including the name, temperament, image, and description.
The complete app.component.html will look as follows:
div
  infinite-scroll
  [infiniteScrollDistance]="2"
  [infiniteScrollThrottle]="1000"
  (scrolled)="onScroll()"
>
  <mat-card *ngFor="let cat of cats">
    <mat-card-header>
      <div>
        <mat-card-title>{{ cat.name }}</mat-card-title>
        <mat-card-subtitle>Temperament: {{ cat.temperament }}</mat-card-subtitle>
      </div>
    </mat-card-header>
    <mat-card-content>
      <div class="img-container">
        <img *ngIf="cat.image" [src]="cat.image.url" width="100" height="100">
      </div>
      <div>
        <span>{{ cat.description }}</span>
      </div>
    </mat-card-content>
  </mat-card>
</div>
One final cosmetic touch to put on this piece is to add a bit of spacing in between our mat-card elements. We do so by adding a margin to our mat-card. We also add a bit of padding around our image as well. Our app.component.css file will look as follows:
.mat-card {
    margin: 10px !important;
    max-height: 200px;
    overflow-y: auto;
}

.img-container {
    float: left;
    padding-right: 10px
}
Once you’ve finished implementing this code, you can run the command ng serve to start up your application then view it in the browser. The final product will behave in a similar manner to the recording:
This concludes the implementation of infinite scrolling using Angular. I hope this demo has been helpful. If any questions, concerns, or feedback, don’t hesitate to let me know. Thank you for reading!



 How to create custom types in TypeScript?