Angular components are the fundamental building blocks of architecture. Once you’ve understood component architecture, you can build a picture in your head as to how to assemble your interface based on data communication.
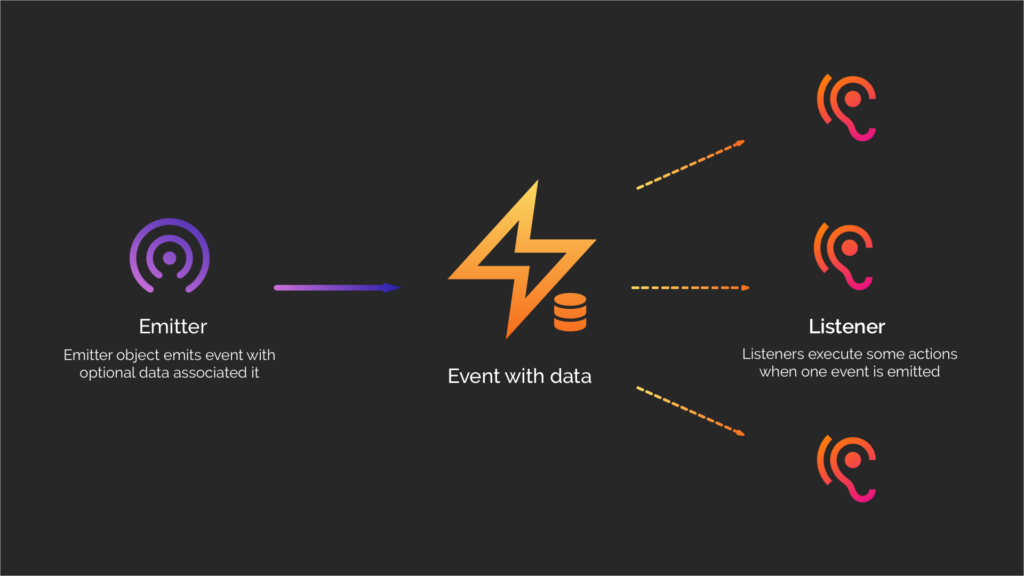
In this post we’re going to dive into Angular components and how to use the EventEmitter and Outputs, so we can transfer or notify any parent component that something has changed, or we would like to change it. This is typically done via “events”, hence our “EventEmitter” and is designed around a uni-directional data flow system that adopts a much more reasonable approach to application development.
Introduction
This tutorial will cover stateless component events using the EventEmitter API and @Output decorator. These allow us to emit change or any custom event names from a custom component in Angular.
Stateful (parent) component binding
Much like in the previous tutorial, where we setup an @Input decorator to accept an input binding, we can do the same and listen in the parent for when a value changes inside our child component.
To do this, we’ll head back to our parent component that’s rendering out our count:
import { Component } from '@angular/core';

@Component({
  selector: 'app-root',
  template: `
    <div class="app">
      Parent: {{ myCount }}
      <counter
        [count]="myCount"
        (change)="countChange($event)">
      </counter>
    </div>
  `
})
export class AppComponent {
  myCount: number = 10;
  countChange(event) {

  }
}
I’ve made a few additions here:
- Changed
initialCounttomyCount, we are no longer setting an “initialCount”, therefore the count state will be managed in the parent once the child component makes a change to it - Created a custom
changeproperty to the<counter>template, using()event binding syntax, like we learned when we created our first component this signifies some kind of event (such as aclickwhen used on a native element Node). - Logged the
myCountproperty in the parent - Added a
countChange() {}method to the class, and passed it into the(change)event listener
This sets up our finalised uni-directional dataflow. The data flows down from the AppComponent class, into the “, the counter can then change the values – and once the value has changed we expect countChange() to be called. We now need to wire this up.
@Output decorator
Much like using Input, we can import Output and decorate a new change property inside our CounterComponent:
import { Component, Input, Output } from '@angular/core';

@Component({...})
export class CounterComponent {

  @Input()
  count: number = 0;

  @Output()
  change;

  // ...

}
This will configure the metadata necessary to tell Angular this property is to be treated as an output binding. However, it needs to sit alongside something called the EventEmitter.
EventEmitter
This is the interesting part. To be able to use our Output, we need to import and bind a new instance of the EventEmitter to it:
import { Component, Input, Output, EventEmitter } from '@angular/core';

@Component({...})
export class CounterComponent {

  // ...

  @Output()
  change = new EventEmitter();

  // ...

}
Using TypeScript to the fullest we’d do something like this to signify the type of event value we are emitting, and our change output is of type EventEmitter. In our case we are emitting a number type:
import { Component, Input, Output, EventEmitter } from '@angular/core';

@Component({...})
export class CounterComponent {

  // ...

  @Output()
  change: EventEmitter<number> = new EventEmitter<number>();

  // ...

}
Invoking the EventEmitter
So what’s happening here? We’ve created a change property, and bound a new instance of EventEmitter to it – what next?
We can simply call our this.change method – however because it references an instance of EventEmitter, we have to call .emit() to emit an event to the parent:
@Component({...})
export class CounterComponent {

  @Input()
  count: number = 0;

  @Output()
  change: EventEmitter<number> = new EventEmitter<number>();

  increment() {
    this.count++;
    this.change.emit(this.count);
  }

  decrement() {
    this.count--;
    this.change.emit(this.count);
  }

}
This will then emit a change to our (change) listener we setup in the parent, to which our countChange($event) callback will be invoked, and the data associated with the event will be given to us via the $event property.
Stateful callback assignment
Here’s what we’ll need to do, re-assign this.myCount with the event that’s passed back. I’ll explain why below:
import { Component } from '@angular/core';

@Component({
  selector: 'app-root',
  template: `
    <div class="app">
      Parent: {{ myCount }}
      <counter
        [count]="myCount"
        (change)="countChange($event)">
      </counter>
    </div>
  `
})
export class AppComponent {
  myCount: number = 10;
  countChange(event) {
    this.myCount = event;
  }
}
This creates a pure uni-directional dataflow. The data comes from AppComponent, flows into our counter, the counter makes a change, and emits that change back to the parent on our command – via the EventEmitter we setup. Once we’ve got that data back up, we merge those changes back into our parent (stateful) component.
The reason we’re doing this is to demonstrate that Parent: {{ myCount }} updates at the same time our Output informs the parent.
Bonus: custom property names
Much like we learned with @Input() and creating custom property names, we can also do the same with @Output().
Let’s assume that we change the (change) binding to (update):
@Component({
  selector: 'app-root',
  template: `
    <div class="app">
      Parent: {{ myCount }}
      <counter
        [count]="myCount"
        (update)="countChange($event)">
      </counter>
    </div>
  `
})
export class AppComponent {
  myCount: number = 10;
  countChange(event) {
    this.myCount = event;
  }
}
We can hook up our custom property name, whilst preserving the internal @Output property name:
@Component({...})
export class CounterComponent {

  // ...

  @Output('update')
  change: EventEmitter<number> = new EventEmitter<number>();

  increment() {
    this.count++;
    this.change.emit(this.count);
  }

  decrement() {
    this.count--;
    this.change.emit(this.count);
  }

}
Essentially, we’re just telling Angular here to lookup update as the property to be bound to, and we can continue using this.change internally.
So there you have it, the guide to using Outputs with EventEmitter in Angular’s components. Now you understand the model, happy coding!


 Difference between (change) and (ngModelChange) in Angular