Worldwide, Git is the most popular version control system. A version control system records the changes we make to our code over time in a special database called a repository. When reviewing our project history, we can see who made what changes when and why, and if we make a mistake we can easily revert our project to an earlier point.
If we don’t use a version control system, we’ll have to keep copies of the entire project in various folders. This is very slow and doesn’t scale particularly when multiple people are working on the same project, since they have to constantly send back and forth the latest code via email or some other mechanism and then manually merge the changes, so basically, we can track our project history and collaborate together with a version control system. There are now two types of version control systems.
Centralized — Using this system, all team members access a central server to get the latest copy of the code and to share their changes. If the server goes offline, we are not able to collaborate with team members due to the single point of failure. As a result, we must wait until the server is back online. One example of a centralized version control system is Subversion.
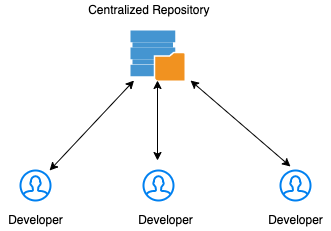
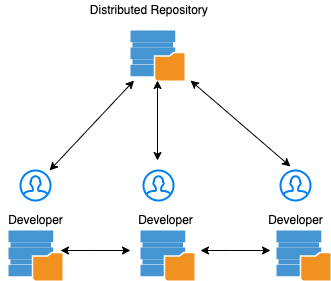
Distributed — With this system, every team member has a copy of the project with its history on their machine. Even if the central server is offline, we can still synchronize our work directly with others. An example of a distributed version control system is Git.
Installing Git
Follow the instructions on https://git-scm.com/downloads to easily download and install the latest Git version on your machine.
Configuring Git
We have to specify a few settings before we start using Git.
- Name
You can also set other settings like the default editor, command line coloring, or how the end of lines should be handled.
We can specify these settings at three different levels
- System — For all users on your machine
- Global — All repositories of the current user
- Local — The current repository
Setting user name at global level
$ git config --global user.name "Mike Whatson"

Setting email at global level
$ git config --global user.email hello@jslib.dev

Set automatic command line coloring
$ git config --global color.ui auto

Edit all global settings in one go
$ git config --global -e

Check you configuration settings
$ git config --list
Git Workflow
Git has three main states that your files can reside in
- Committed — A file is considered committed if it is included in the Git directory.
- Staged — When it has been modified and added to the staging area, it is staged.
- Modified — The file has been changed since it was checked out but has not been stagged.
This leads us to the three main sections of a Git project: the working tree, the staging area, and the Git directory.
- Working Tree — It is a single checkout of one version of the project. These files are pulled out of the compressed database in the Git directory and placed on a disk for you to use or modify.
- Staging Area — It’s a file generally contained in your Git directory that stores information about what will go into your next commit.
- .git Directory — It’s where Git stores the metadata and object database for your project. This is the most important part of Git and it is what is copied when you clone a repository from another computer.
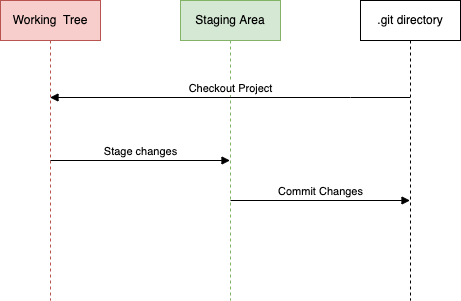
So the basic Git workflow looks like this
- Modifying files in your working tree
- By staging only the changes you want to be included in your next commit, you only add those changes to staging.
- You commit, which takes a snapshot of the files in the staging area, and permanently stores it in your Git repository
Getting a Git repository
- You can turn a local directory that is not currently under version control into a Git repository.
- You can clone an existing Git repository.
Initializing a repository
Create a directory/folder or select any directory that you want to control with Git and go inside the directory, we first initialize the empty git repository with the git init command. This creates a new subdirectory named .git that contains all your necessary repository files. By default, Git will create a branch called master.
$ mkdir project
$ cd project
$ git init
Cloning an existing repository
You can clone a repository with git clone <url>. This will create a directory name vscode and initialize a .git directory inside it, pull down all the data for that repository and check out a working copy of the latest version.
$ git clone https://github.com/microsoft/vscode.gitRecording changes to the repository
Each file in your working directory can be in one of two states:
- Tracked — Tracked files are files that were in the last snapshot, as well as newly staged files. They can be unmodified, modified, or staged.
- Untracked — Untracked files are everything else, in short, these are files that are not tracked by Git.
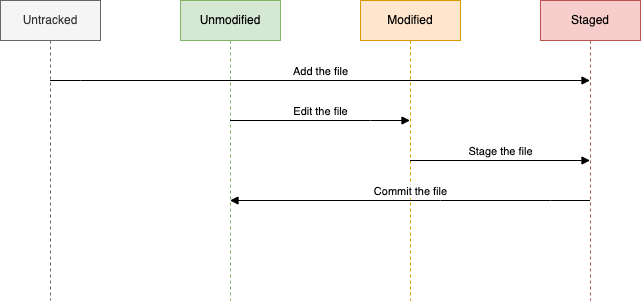
Check the state of the files
Command git status can be used to check the state of the files.
$ git status

On branch master
Your branch is up to date with 'origin/master'.
nothing to commit, working tree clean
Working tree clean means here none of your tracked files are modified.
Now let’s add a new file to the project.
$ echo "Hello World" > ReadMe.txt
$ git status

On branch master
Your branch is up to date with 'origin/master'.
Untracked files:
(use "git add <file>..." to include in what will be committed)ReadMe.txtnothing added to commit but untracked files present (use "git add" to track
ReadMe.txt file is untracked and shown the “Untracked files” heading in the status output. Untracked basically means that Git sees a file you didn’t have in the previous commit and which is still not being staged.
Tracking new files
In order to track a new file, it must be added to the staging area with the git add <files> command.
$ git add ReadMe.txt
$ git status

On branch master
Your branch is up to date with 'origin/master'.
Changes to be committed:
(use "git restore --staged <file>..." to unstage)
new file:   ReadMe.txt
You can tell that it’s staged because it’s under the “Changes to be committed” heading.
Staging Modified files
Let’s change a file that was already tracked, in my project I had pom.xml which I have modified.
$ git status

On branch master
Your branch is up to date with 'origin/master'.
Changes to be committed:
(use "git restore --staged <file>..." to unstage)

new file:   ReadMe.txt

Changes not staged for commit:
(use "git add <file>..." to update what will be committed)
(use "git restore <file>..." to discard changes in working directory)
modified:   pom.xml
The pom.xml file appears under a section named “Changes not staged for commit” which means that a file that is tracked has been modified in the working directory but not yet staged. To stage it you run the git add command.
$ git add pom.xml
$ git status

On branch master
Your branch is up to date with 'origin/master'.
Changes to be committed:
(use "git restore --staged <file>..." to unstage)

new file:   ReadMe.txt
modified:   pom.xml
Both the files are staged and will go into your next commit.
At this point, we make another change to pom.xml before we commit it and run the git status command.
After making changes to pom.xml file
$ git status
On branch master
Your branch is up to date with 'origin/master'.
Changes to be committed:
(use "git restore --staged <file>..." to unstage)

new file:   ReadMe.txt
modified:   pom.xml

Changes not staged for commit:
(use "git add <file>..." to update what will be committed)
(use "git restore <file>..." to discard changes in working directory)

modified:   pom.xml
Now pom.xml is listed as both staged and unstaged. It turns out that Git stages a file exactly as it is when you run the git add command. If you modify a file after you run git add, you have to run git add again to stage the latest version of the file.
$ git add pom.xml
$ git status
On branch master
Your branch is up to date with 'origin/master'.
Changes to be committed:
(use "git restore --staged <file>..." to unstage)

new file:   ReadMe.txt
modified:   pom.xml
Viewing staged and unstaged changes
If you want to see exactly what was modified, you can use the git diff command. So first let’s which files are in the working area and which are in a staged area with the git status command.
$ git status
On branch master
Your branch is up to date with 'origin/master'.
Changes to be committed:
(use "git restore --staged <file>..." to unstage)

new file:   ReadMe.txt

Changes not staged for commit:
(use "git add <file>..." to update what will be committed)
(use "git restore <file>..." to discard changes in working directory)

modified:   pom.xml
Git diff with no other arguments compares what is in your working directory with what is in your staging area. The result tells you the changes you have made that you haven’t yet staged. Here we can see pom.xml is not yet staged so we should only be seeing diff of pom.xml and ReadMe.txt file.
$ git diff
diff --git a/pom.xml b/pom.xml
index 00d0f61d..f96cfc48 100644
--- a/pom.xml
+++ b/pom.xml
@@ -2,7 +2,7 @@
<modelVersion>4.0.0</modelVersion>
<groupId>com.learncsdesign</groupId>
<artifactId>git-learning</artifactId>
-       <version>6.4.136</version>
+       <version>6.7.136</version>
<name>git-learning</name>
If you want to see what you have staged that will go into your next commit, you can use the below command. As we saw earlier ReadMe.txt was in the staging area, so we can get its diff.
$ git diff --staged
diff --git a/ReadMe.txt b/ReadMe.txt
new file mode 100644
index 00000000..557db03d
--- /dev/null
+++ b/ReadMe.txt
@@ -0,0 +1 @@
+Hello World
Committing Changes
Now with files in your staging area, you are ready to commit them with the git commit command.
$ git commit -m "commit message"Skipping Staging Area
You can skip the staging area by using the -a option to the git commit command. This automatically stages every file already tracked before doing the commit, letting you skip git add.
$ git commit -a -m "commit message"
OR
$ git commit -am "commit message"
Removing files
A file can be removed from Git by removing it from your tracked files and committing it. With git rm, you can do that, and it will also remove the files from your working directory, so they won’t appear in your working directory as untracked files. As soon as you commit, the file will be deleted and no longer tracked.
$ git rm ReadMe.txt
$ git status
On branch master
Your branch is ahead of 'origin/master' by 1 commit.
(use "git push" to publish your local commits)

Changes to be committed:
(use "git restore --staged <file>..." to unstage)

deleted:    ReadMe.txt
If you wish to keep the file in your working tree but not in your staging area. This means you want to keep the file on your hard drive, but no longer have it tracked by Git.
$ git rm --cached ReadMe.txt
On branch master
Your branch is ahead of 'origin/master' by 1 commit.
(use "git push" to publish your local commits)

Changes to be committed:
(use "git restore --staged <file>..." to unstage)

deleted:    ReadMe.txt

Untracked files:
(use "git add <file>..." to include in what will be committed)

ReadMe.txt
Moving Files
You can rename a file in Git
$ git mv ReadMe.txt RenamedReadMe.txt
$ git status
On branch master
Your branch is ahead of 'origin/master' by 1 commit.
(use "git push" to publish your local commits)

Changes to be committed:
(use "git restore --staged <file>..." to unstage)

renamed:    ReadMe.txt -> RenamedReadMe.txt
Viewing the commit history
You can list all the commits made in that repository in reverse chronological order with the git log command.
$ git log
commit 85a8a2cdc6fc87cc06deb3b5ff56d86e69395c06 (HEAD -> master)
Author: Neeraj Kushwaha <learncsdesign@gmail.com>
Date:   Sat Jan 22 18:08:12 2022 +0530
ReadMe.txt added
Undoing things
If you want to redo the commit after making additional changes you forgot, stage them, and commit again using amend option
$ git commit -m "added debug logs"
$ git add ReadMe.txt
$ git commit --amend
Unstaged a staged file
If you have accidentally staged ReadMe.txt by doing git add and later required to be unstaged you can use git restore.
$ git status
On branch master
Your branch is ahead of 'origin/master' by 1 commit.
(use "git push" to publish your local commits)

Changes to be committed:
(use "git restore --staged <file>..." to unstage)

modified:   ReadMe.txt

$ git restore --staged ReadMe.txt
Reverting a modified file
If you don’t want to keep your changes to the ReadMe.txt, you can easily revert it back to what it looked like when you last committed.
$ git status
On branch master
Your branch is ahead of 'origin/master' by 1 commit.
(use "git push" to publish your local commits)

Changes not staged for commit:
(use "git add <file>..." to update what will be committed)
(use "git restore <file>..." to discard changes in working directory)
modified:   ReadMe.txt

no changes added to commit (use "git add" and/or "git commit -a")

$ git restore ReadMe.txt
$ git status

On branch master
Your branch is ahead of 'origin/master' by 1 commit.
(use "git push" to publish your local commits)

nothing to commit, working tree clean
Working with remotes
To be able to collaborate on any Git project, you need to know how to manage your remote repositories.
To see which remote servers you have configured, you can run the git remote -v command.
$ git clone https://github.com/microsoft/vscode.git
$ cd vscode
$ git remote -v
origin https://github.com/microsoft/vscode.git (fetch)
origin https://github.com/microsoft/vscode.git (push)
Adding Remote Repository — Git clone command implicitly adds the origin remote for you, you can add a new remote explicitly.
$ git remote add personal https://github.com/sparkmylife/vscode.git
$ git remote -v
origin https://github.com/microsoft/vscode.git (fetch)
origin https://github.com/microsoft/vscode.git (push)
personal https://github.com/sparkmylife/vscode.git (fetch)
personal https://github.com/sparkmylife/vscode.git (push)
Fetching/Pull from remotes — You can mention the remote name git fetch <remote>.
$ git fetch originPushing to remotes — You can mention the name of the remote along with the branch name while doing push git push <remote> <branch>
$ git push origin masterRenaming and removing remotes — You can run git remote rename to change a remote’s name. If you want to remove a remote you can run git remote remove
$ git remote rename personal upstream
$ git remote -v
origin https://github.com/microsoft/vscode.git (fetch)
origin https://github.com/microsoft/vscode.git (push)
upstream https://github.com/sparkmylife/vscode.git (fetch)
upstream https://github.com/sparkmylife/vscode.git (push)

$ git remote remove upstream
$ git remote -v
origin https://github.com/microsoft/vscode.git (fetch)
origin https://github.com/microsoft/vscode.git (push)
Tagging
All releases are tagged to a specific hash in a repository history as being important.
Listing Tags — With the command git tag, you can list all tags in alphabetical order.
$ git tag
v1.0.0
v1.1.0
v2.0.0
Creating Tags — Git supports two types of tags:
- Lightweight Tag — It is very much like a branch that does not change, it’s just a pointer to a specific commit.
$ git tag v3.0.0- Annotated Tag — It is stored as full objects in the Git database. It is checksummed and contains the tagger name, email, and date.
$ git tag -a v3.0.0 -m "Release version 3.0.0"Sharing Tag — By default, the git push command does not transfer tags to remote servers. You have to do it explicitly.
$ git push origin v3.0.0Creating branch from Tag — If there is a production issue and for releasing a hotfix, you need to create a branch from Tag on top of which you want to create a hotfix.
$ git checkout -b hotfix-v3.0.0 v3.0.0In the next post, we will dig deeper into Git branching.



 Get Going With Git — Part 2